I like to think of myself as a connoisseur of hair colour - nothing wacky or by any means professional, but having had my hair an array of colours from bleached blonde to dark brown, mahogany to black, dirty blonde to dip-dyed and even a few blue streaks here and there when I was fourteen, I like to think I have tried enough brands and types of home hair colours to be able to tell the difference between the good and the bad - and sometimes the ugly! I have used L'Oréal Préférence home hair colour before, using one of their Ombre kits which worked really well and was fairly easy to use, but this time, going into Autumn in a few weeks, I wanted something more subtle, but more exciting than the one-tone hair I have currently - so I decided to try one of their Glam Highlights colours.

Showing posts with label Beauty. Show all posts
Showing posts with label Beauty. Show all posts
Sunday, 16 August 2015
Saturday, 15 August 2015
The LUSH Polychromatic Era | Haul
I know I have said before that I rarely go to Lush, and that when I do I stock up with all the wonderful things they have to offer - however, walking past the window display in the Lush store here in Cheltenham, I couldn't resist popping in and spending my last few pennies on trialling some of their new products before my spending spree once payday has come around. As usual, Lush hasn't disappointed in their array of new products for August, bringing a psychedelic feel to the end of Summer, keeping that Summer vibe alive - and I picked out two very differently scented products to try before I go all out at the end of the month.
Sunday, 2 August 2015
LUSH | Summer Haul Part Three | Bath Bombs
Bath Bombs! My favourite things to buy from Lush, ever! I absolutely love their range of bath bombs and melts in all sorts of shapes, sizes and smells. Don't forget to check out Part 1 (Soaps and Massage Bars) and Part 2 (Jellies, Scrubs and Cleansers) as well to see all the things I got from Lush most recently...
Friday, 31 July 2015
LUSH | Summer Haul Part Two | Cleansers, Scrubs and Jellies
One of the things I can't get enough of from Lush is their scrubs, shower jellies, cleansers and face masks - and definitely go over haul when buying them. Continuing on from my Part 1 Lush Summer Haul...delve with me into the land of my favourite recent Lush pots!
Tuesday, 28 July 2015
LUSH | Summer Haul Part One | Soaps and Massage Bars
A few weeks back, it came to that time of the quarter when I take my trip to LUSH and end up, as usual, buying half the shop! I got some good old trusted classics, some new favourites for a second time, and some new exciting things to try. I love Lush products, and haven't actually found a product that I don't like yet - so please don't be confused as to why I only go to a place that I love so much four or five times a year - it's mainly because I; a) know if I go in there I'm going to spend a fortune more than I have on all the exciting things and b) because I find the stuff so pretty and gorgeous smelling that I feel bad using them and don't want to not have them any more - it's a dilemma! So, as with every Lush trip I take, I ended up getting way more than I needed and spending more than I should have done - although, snaps for me for keeping it under £20 - believe me, when it comes to Lush, that's an achievement for me!
Thursday, 23 July 2015
BareMinerals Beauty Must Haves Kit | Review
I have never really used bareMinerals products before, and have been meaning to try some out for a long time, and after sifting through a magnitude of random items when moving house and going through my old bedroom at my parents house, I found a bareMinerals bareBeauty kit that my Mum got me for Christmas just gone (and I'm not even sure you can get this specific kit any more!) - it seemed like the perfect time to see what bareMinerals had to offer and what the products were like for my complexion and skin type. I think these little bareMinerals kits are fantastic if you need a quick and easy look for when you're travelling or if you're really pushed for space as they are so compact and you literally get everything you need in one little box!
Wednesday, 22 July 2015
USA --> UK; International Box Swap with Conk's Canister
Constance of Conk's Canister blog is one of the first bloggers I started speaking to when I first joined Twitter and the fabulous blogging world back in February and is one of the people who has always been there for a chat or to help with tips and advice when needed, so it was obvious when deciding to do an international box swap that she would be my first choice to swap with! We set a budget and got shopping for lots of lovely beauty and lifestyle things to send to one another, including a few special requests (Sephora makeup and Jolly Ranchers for me, and Tanya Burr lipgloss for Constance)...
Wednesday, 3 June 2015
Lipcote Lipstick Sealer | Review
I discovered Lipcote when I was given it as a Christmas present, and completely forgot that I had it until I was searching for a bright lipstick the other day! I decided to give it a go, as smudging my lipstick or wiping if off by accident is something I'm very talented at. The Lipcote coat claims to create a clear layer of sealant on top of your lipstick to stop smudging and lipstick transference for a number of hours!
Saturday, 23 May 2015
Review | Avon Peeling & Brittleness Nail Solver
Although it's not a new product, I have recently turned to using the Avon Nail Experts Peeling & Brittleness Solver nail treatment after having acrylics on my nails, with Jessica nail polish. I used to bite my nails a lot - and I mean my nails rarely grew a while millimetre before I bit them again when I was younger. That and a lack of calcium in my diet until I was towards the end of my teens left my nails in a brittle state to the point that I can bend them downwards with ease. This, obviously means they are incredibly weak and I have issues with peeling and easy breakages, especially after having false nails on! I was hoping that the Avon Nail Experts formula could help!

My nails three weeks ago, when I first started using this product were broken, chipped and in need of some serious TLC! Not one of my nails made it past having a one millimetre distal edge before some kind of chip or peeling happening which weakened the nails more than they were already and caused them to break or peel off to an alarmingly short length. Whilst this product has a slightly strange, a strong smell, that made me feel like it was just all the more better for what I needed it to do. I put the product on my nails three weeks ago, when my nails were in a state of breaking from weakness before they had even has the chance to have more than a millimetre long distal edge! I made sure that all my nail varnish and other crap was off my nails before applying the nail expert formula to all my nails.
Saturday, 16 May 2015
£13.02 Make Up Challenge
I have always wanted to try a budget make-up challenge and have seen the $20 make-up challenge everywhere, but being in the UK, I don't have $20, so instead I got the currency converter out and am limiting myself to £13.02 (odd I know...but bare with me).
What did I manage to get?

Concealer | Makeup Revolution Liquid Concealer, Natural, £1.50 ($2.31)
Foundation | Collection Naturally Matt Foundation, Ivory, £2.99 ($4.62)
Blusher | Makeup Revolution Powder Blusher, Sugar, £1.00 ($1.54)
Contouring | MUA Blusher, Lolly, £1.00 ($1.54)
Eye Shadow | NYC HD Quattro Eye Shadow Palette, Fashion Boot Camp, £2.99 ($4.62)
Eyeliner & Brows | MUA Eyebrow Pencil, Brunette, £1.00 ($1.54)
Lashes | Hello Kitty False Lashes, £0.52 ($0.74)
Lips | MUA Lipstick, Nectar 16, £1.00 ($1.54)
Nails | MUA Nail Polish, Pistachio Ice Cream, £1.00 ($1.54)
TOTAL SPEND: £13.01 ($19.99)
EXCHANGE RATES ARE CORRECT AT THE TIME OF PURCHASING PRODUCTS (EXCHANGE RATES MAY HAVE CHANGED)
I didn't want to get stuff that was on offer or things that were in a sale, so I ventured into one of my favourite, cheaper makeup high street stores where I was certain I could find everything I needed for a complete look. I started off looking in Boots, but soon realised that having just £13 to spend was going to be a bit of a nightmare, so off to Superdrug I went. I'm a massive fan of Superdrug for things you need in a hurry of if you just need a few cheap things to take with you somewhere you don't mind losing them or leaving them behind - like when I went to Reading Festival!
Let's Create a Look

So, I couldn't afford any makeup brushes, other than the small eye shadow brush that came included in the NYC quad palette, so it was finger using time. I usually don't like using my fingers, as I have quite dry skin, and I find if I use my fingers, I tend to get patches in my foundation, but I just had to make do, and ended up using the concealer much more than the foundation. I was quite impressed by the Makeup Revolution Liquid Concealer, as it went of well and gave ok coverage for the price you pay for it, but I found the Collection Naturally Matt Foundation a little too watery for my skin and it wasn't able to give me the coverage I would like, but for more moisturised skin types, I could see it giving a beautiful natural look for a good price.

Blush was probably one of the harder things to do in this look, as I didn't have any brushes budgeted for, other than the small eyeshadow brush from the NYC palette. So, finger time again. I've never actually attempted to use my fingers to do blush, and it's certainly not an experience I want again. I didn't put on anywhere near as much blush as I intended to and the spacing was a lot bigger than I had planned, but by using the darker shade of blush by Revolution as a contour and the MUA blush as a highlighter, I think it turned out pretty well considering. My fingers were pink for about an hour though! I really liked the MUA blush as the colour was really vibrant and it blended really well (considering I was using my fingers). The Revolution blush, however, was a little more difficult to work with as it didn't spread and blend as well as I would have liked.

I tried to create a simple, natural eyeshadow look (you can see in this picture closer up the beautiful colour of the MUA blush!) by using the golden tone as an all over eyeshadow colour. I then took the cream colour and dabbed it, using my little finger, into the inside crease of my eye and underneath my brown line as a highlighter. I then used my index finger to take the lighter green colour and used it on the outer half of my eyelid, blending it with the gold. I then took the small eyeshadow brush and used the darker green-grey colour in the outer crease of my eyelid and along my lash line for a bit of definition as I had a brown colour to use for my eyeliner. I really love the eathy tones in his palette, while not natural summery colours, I think the undertone of glitter makes them glamorous whilst still being subtle and will go really well with staple oranges, bronzes and whites in the summer.

I then moved on to my brows, as I was using the same MUA eyebrow pencil in brunette to do my eyeliner (killing to birds with one stone #win). I really liked this eyebrow pencil, as it had the brush on the end of the pencil, and it has really good coverage, so you only need to use it very lightly! It also makes a really nice eyeliner too as it's not as harsh as black, which I love in the summer. I used it on my lower lash line three-quarters of the way across from the outside of my eye, and along the top three-quarters of my upper lash line in the same way.

I had a mega amount of difficulty with the eyelashes, but then again, what did I expect from a Hello Kitty brand (budget prevailed!). Eventually, by having to use my own spare glue rather than their glue, which was ok for taking photographs, but came off after about ten minutes, I got then stuck on and looking pretty natural. The good thing about these lashes is they are designed for the younger generation, therefore are short and look a lot more natural than some of the other eyelash brands out there. They do look a lot like a thick splash on mascara, but I noticed that without being able to afford mascara, I was left with a few stray lashes here and there, though they weren't noticeable unless I had my face up against my makeup mirror.

The MUA lipstick was possibly one of my favourite products in this look, as it's a beautiful coral colour, with tints of both pink and orange. It's also incredibly moisturising and has a little bit of a lip gloss shine to it. I've tried one or two MUA lipsticks in the past, and they are not where near as good as their new range of colours. It's such a summery colour I can see myself wearing this very often in the next few months. I think it really gave the look a little extra, as I was quite natural on the eyeshadow and blush - it also goes really well with the green and gold tints of the eyeshadow look I did.

Nails were the final thing I did, choosing this beautiful pale aqua colour from MUA. I really like this nail varnish, although I did need to do at least two coats (three one some nails) to get the colour to the vibrancy that I wanted. It's a little bit watery, but such a beautiful colour. The small size bottle is also really handy to take around with you if you need a top up or if you're wanting to take it with you when travelling. I think the colour went really well as it blended with the green tones of my look, but gave a whole separate summery feel to the look too.
And the final look is...

I hope you like this summery look, it was incredibly difficult to decide what I wanted to buy for just over £13 ($20), but I think most of the products I will be using again! Let me know what you think and comment your links if you have done this challenge too! It will be interesting to see what budget makeup brands are available in other countries, as I know a lot of the ones here such as MUA and Revolution are available in many other places!
Saturday, 18 April 2015
Glossybox Review | April
The April Glossybox is here!
My April Glossybox arrived a couple of days ago and I have, once again, gone on a spree testing all the wonderful things I've been sent. But, firstly, I would just like to draw everyones attention to the box itself.
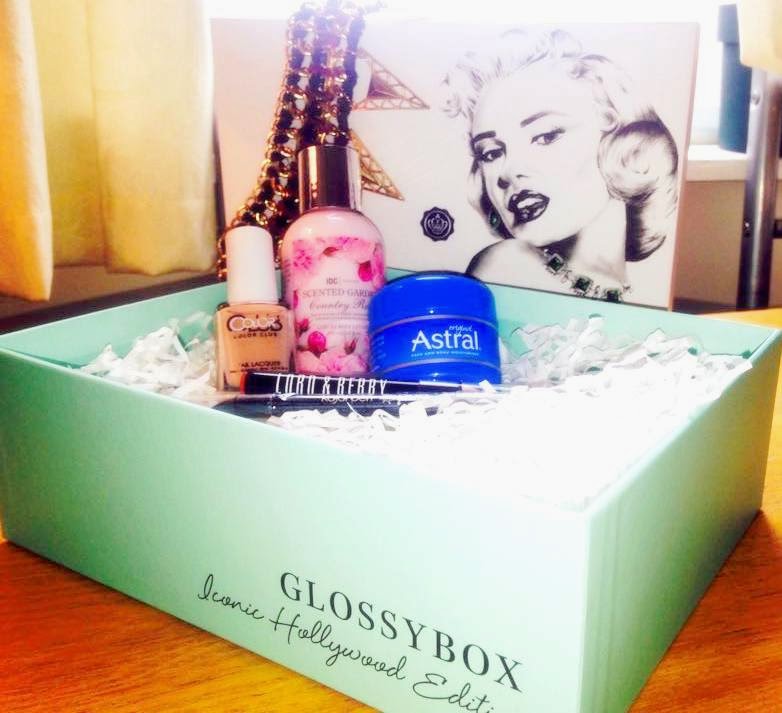
As well as being a beautiful green-blue colour that reminds me of duck eggs, it has an image of the fabulous Marilyn Monroe on, including a quote from her
"We are all of us stars
and we deserve to
twinkle"
just sums up what I love about Glossybox! I also love that this is a themed box with the theme Hollywood Glamour including the signature red lips, bold eyes and pastel nails that I am sure to be *attempting* to rock this spring/summer!
What did I get in my April box?

Wednesday, 15 April 2015
Barry M Spring Palettes

I used to love Barry M makeup, but over the winter I have started to use it less and less. I don't know why, but Barry M screams "Summer!" to me no matter what it is from them I'm using. So, now that the weather is getting that little bit warmer (not that we know what true warm weather is here in the UK), I took my opportunity to pop into Boots and take a look at the Barry M make up for this season. I ended up picking up three palettes, something which I have never brought from Barry M before...

The three palettes I got were the Brow Kit, the Chisel Cheeks Contour Kit and the Smokin' Hot Shadow & Blush Palette. I love the packaging or each of these first off as it's so clear what you're getting inside, and they look so chic and are a great quality. The only draw back is I'm a little worried about putting them loose in my makeup bag if I'm going to take it anywhere because they don't have a proper closing mechanism, it's just a somewhat feeble magnetic system. I'm not fussed sticking an elastic band around them when I travel though as they are such beautiful palettes!
Brow Kit | Shape & Define

Eyebrows is something I have struggled with all my life. Mine are the most impossible eyebrows, as no matter how much I thread, tweeze or shape them, they are bushy and untamed a day later. The thing that drew me to this palette is the fact that there is a lighter brown wax (left) to keep your lashes in place once you have shaped them (which is a life saver for me). You also get the darker brown powder and highlighting powder, along with a double ended brush and a set of tweezers. With a mirror in the lid as well, what more could you possibly want! This palette is really easy to use and the colours work really well together. I was also really impressed with the wax. I was a little worried at first because I've not used setting wax before, but it was really good and kept my eyebrow shape in place all day.
Contour Kit | Flawless Chisel Cheeks
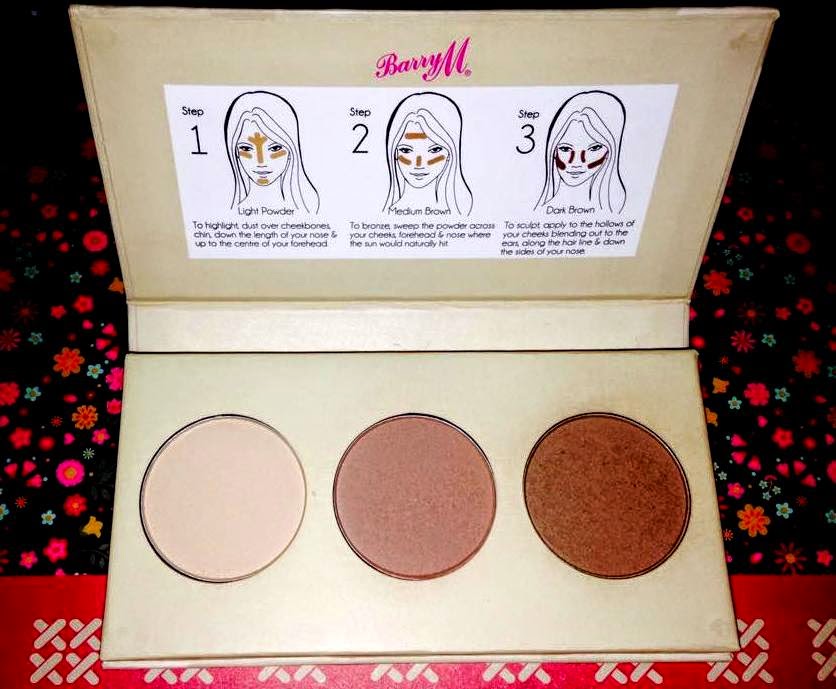
Contour Kits are another thing I haven't tried as a whole palette before, I tend to use separate highlighters and bronzers to build up a contour. Having the tools all in one palette is definitely easier, and the step by step guide makes this palette perfect for first time users or those relatively new to using contour kits. The darkest colour (right) is a little dark for my skin tone, so this is definitely something I will be saving for the summer to use when I have more of a tan! The colours in this aren't too pigmented, though, which is nice for a more subtle look and to build up for more of a vibrant look for the evening, which makes this a brilliant all around palette. Contour Kits are definitely something I will be adding to my every day makeup routine, rather than my make shift contouring routine.
Shadow & Blush | Smokin' Hot Palette

This palette is something a little different to what I'm used to, as most of the smokey eye looks I go for use browns and greys rather than blacks. However, I couldn't resist the lighter shades in this palette, especially the pink-peach blush, which is such a great colour for the summer. I've tested out the colours, using a variety of all the colours available, and for building up a smokey eye, this palette has everything you need. I really like the shadows because they aren't overly pigmented or glittery, which I was initially worried about, but just give the right amount of glimmer.
What palettes and kits do you swear by? Let me know in the comments below what kits are on your Hot List this summer!
Saturday, 4 April 2015
Review | Ted Baker Body Range
I have always really loved the packaging of Ted Baker beauty products - however, have never before brought myself to buy them. However, when they were on 3-for-2 at Boots, I couldn't resist picking up some of the ones I've had my eye on for a few weeks now...

Ted Baker No1 Langley Court Collection
Body Lotion
The first product I picked up was the body lotion, which comes in a beautiful box in a vibrant orange colour. I was instantly drawn to the brightness of the orange and the contrast in the pastel house images on the box. The bottle was the same, with a beautiful golden lid and the lotion is a really pale pastel orange colour. The smell is absolutely incredible and smells really fruity and reminds me of my Mum a little, which is surprisingly comforting. I used this on my hands last night, and my hands instantly felt really soft and they weren't sticky like a lot of other moisturisers and lotions which I was happy about as I'm a clumsy mess at the best of times! The smell didn't last as long as I would have hoped, as I could hardly smell it about an hour and a half later, but my hands still felt really soft in the morning and looked well hydrated. I have a lot of problems with the skin around my nails as I have a tendency to bit it, so I get a lot of dry skin, but I can see an improvement in this as well.
Body Wash
I also got the body wash, which, again, was too beautiful a colour to pass up. I have tried this twice now, and it has a really nice fruity smell to it, but also reminds me a little of a perfumed smell, which is nice and a change to normal shower gel smells. I have also used this in the bath, pouring a little bit in instead of bath soak and it created a lot more bubbles than I was expecting. It was nicely moisturising to my skin, and really calming, as I have quite sensitive skin, especially on my legs, I generally have to be careful what products I buy - but I had no problems with this. You also only need a little bit at a time, which means it will last a little longer than some other shower or bath washes.
Body Spray
The final thing I picked up, purely for the smell, was the body spray. This smells almost perfume like, with a hint of a floral scent too. It's really nice and quite strongly fragranced so you don't need to much. Unlike perfume, it doesn't last as long as I would have liked, but I didn't expect it to being a body spray. I take this around with me everywhere I go now. The bottle I got is a little big to carry around in smaller bags, but there are smaller versions available.
The Ted Baker range are a little more pricey than most body lotions and potions, but they are completely worth it. They are incredibly hydrating and smell amazing - they are more of a mature or young adult smell rather than a teen smell, which suits a professional lifestyle, or even if you are going out to a part and want to treat yourself. I love these, and whenever they are on 3-for-2 again, I'm most definitely stocking up!
Thursday, 2 April 2015
Products I Won't Buy Again | Kelly Brook Matte Nail Polish
I own a number of Kelly Brook nail polishes, that I have been collecting over the years from trips to New Look here in the UK. I've loved every single one of them - so I thought, over winter, why not try and get a matte colour for every day wear...

I never actually ended up using this nail polish over the winter, so thought it only right, now the weather is getting warmer and nautical fashion is starting to make a come back, it was time to start wearing this nail polish. I tried to do some nail art (which you can see in my post here) - and this is the first time I've used it. I found the colour really nice, and I loved the matt effect of the polish. It gave a really rich, deep navy colour that I would be happy to wear any season. It was also really easy to apply, and I only needed one coat. It also dried really quickly.

The problems came, however, when I tried to take it off. I found that (as in the picture above) it was really difficult to get off, and I ended up using one side of a pad for each individual nail I was trying to use the remover (which was even had ammonia in) and still, not all the polish came off. I even tried soaking my nails in the polish remover for five minutes and still, my nails had been stained. The colour came off well from the centres after soaking for five minutes, but the colour hadn't budged from the tips of my nails and around the edges.

I tried to put a different colour of nail varnish over the top, however, unless I used a deep colour or put on a number of layers (the image above is with two layers of polish), the colour was going to show through and was certainly not going to budge! I wouldn't buy this again, however, I do really like the colour.
Have you had any of these problems with matt nail polishes? Is it just me being a bit of a klutz in the polish removing department? Do nail extensions and false nails make a difference to the matt polish removal process unlike normal polishes? Let me know in the comments below!
Sally Hansen Nail Art Pens | Review
I will be the first to admit that I am quite un-skilled in the nail art department. I have always loved nail art designs and have wanted to try some simple ones of myself for a while now. I have seen so many Sally Hansen products around at the moment, especially since the retail store open in Leeds city centre, that I felt like I had to try these - especially since they were in Boots for slightly cheaper than in the Sally Hansen store - I got them for £6.99 each. This is quite pricey for nail polish at the best of times, but for pens which have less polish in them than the average pot, I thought they were expensive for what they were. However, I was pleasantly surprised with how well they worked...

It took a few goes and 'pumps' on a piece of paper to get the colour to come down through the nib, but once I had done this initial set up, they have been good to go straight off the bat every time I have used them. I went for three colours, which I thought were fabulous for the spring (Hot Pink, Purple and Aqua). I was initially intrigued by the packaging, as there are a number of designs shown on there using the pens inside. They looked really neat and easy to do, however, I did find that the pens were a little thicker than the packaging made out, and to do such thin lines you had to have an incredibly steady hand. However, the colour are really vibrant, which I was impressed with.

I did find that I had to do a couple of layers of the colours if I was using them over any sort of nail varnish that wasn't white or a very light colour - which made doing intricate designs much more difficult - however, I was still very impressed with the designs I was able to make with these pens based on my previous accomplishments of daubing polish all over my nails and hands! I found that the pens dried really quickly, which was fantastic, however, I did notice that the pens nibs were a little harsh. On a number of occasions of me using this, if I used a nail polish which was a matt colour, or a polish that needed more than one layer, the pen nibs would crack in to the polish and I ended up with having a number of flakes of nail polish in with the pen colour, which looked a little haphazard. I did also find that if I pressed a little harder, the pen had a tendency to splurge polish all over my nail, which happened on more than one occasion - however, I can't tell if that's just me being clumsy.

Overall, I was pretty impressed with these pens. They are a fantastic start point for people, like me, who aren't experienced with nail art and want to have a little mess around, though I do feel like there is better nail art pens out there, at much better values, such as the Barry M nail art pens that are only £5.99 each and perfect for beginners! The Sally Hansen pens are best used for designs on very high pigmented nail polish that only needs one coat and for people who have the time to wait 20 minutes before using them for the nail polish to completely dry - or use a clear nail polish thats very shiny on top before using the pens to prevent cracking. I also wouldn't suggest pressing very hard. However, I really enjoyed using them - I wouldn't buy any more, but as a starter pen I thought they did the job. The colour range is quite good as well, but there isn't a lot of variety in metallic or pastel colours of pen.
Tuesday, 31 March 2015
Products I've Loved | March 2015
I'm usually quite an eclectic shopper and user of products, so it often takes me ages to finish off products - however, the products below have served me so well I would purchase any of them again, and they are all either empty or on their last legs of life!

L'Oréal Elnett Satin Hair Spray 'Very Volume'
I'm a massive fan of the Elnett range from L'Oréal and I find that this is one of the only hair sprays that I find actually gives me long lasting volume for the whole day, which I struggle to find usually. Since having my hair cut it's been a lot easier to keep volume, but when I had my really long hair I used this constantly. I also really love the Cheryl Cole special editions of the Elnett hair spray. I'm also quite clumsy and indecisive, so it's always good for me to use this hair spray for it's brush-out-ability.
Fake Bake Mousse - Luxurious Golden Bronze
I rarely self-tan, however, I find recently, I swear my skin tone is getting paler - I'm not even sure if thats possible! Either way, I used to tan all the time and really easily when I was younger, but now I tend to go blotchy, and will occasionally have that red blotchiness turn into a semi-tan. In these dyer circumstances, I have resorted to fake tanning, something which I swore I would never do again as every attempt I have tried either turned me orange or incredibly streaky. A friend suggested Fake Bake to me, and I ended up getting the mousse as it seems to be the easiest to apply. I was really surprised at how well it went on and how gradual of a tan it gave you, with instant results. I've never been happy with how I look after fake tanning, until using this product - and I will definitely be stocking up for the spring to use on my porcelain legs!
Soap & Glory The Fab Pore 2-in-1 Face Masque & Peeling
With such a long name, it has to be good. And it is! I love the colour of it as a first point - it reminds me of the sea or mint chocolate chip ice cream - not that I would want that on my face! It smells incredible, and because it's a slightly thicker product than some face masks, it doesn't drip down your face after application. It gives a nice warming sensation to your skin, which is really nice and I always use this in the bath as it's such a relaxing feeling and smell. It leaves my skin feeling really fresh and I always see a reduction in the number of spots and black heads that I can see creeping up on my face and neck after using this product. I find this really good to use the day after I've been on a night out and haven't managed to do my full make-up removal routine before crashing into bed.
LUSH D'Fluff Strawberry Shaving Soap
I've never tried a shaving soap before, but I thought I would give this Lush product a go, just for the pure fact that it smells amazing. Granted, it has a strange initial smell, but when you're in the shower, or when it gets wet, the strawberry smell really starts to come through. It's really smoothing and creamy, and leaves my legs feeling much softer after shaving. I also tend to get quite blotchy after shaving as I have fairly sensitive skin on my legs weirdly enough - but this has dramatically reduced the redness as well.
Revlon PhotoReady Eye Primer & Brightener
I really love this stuff. This is my second one I've been through now - which is saying something because you have to use so little they last for ages. I use this almost every time I'm doing my makeup as an eye primer when I want my eyeshadow to stay for a long period of time, but most often I use it every day that I'm not wearing eye makeup as it's really creamy and moisturising as well. I also, quite naughtily, use this as a concealer for my under eyes sometimes, if I'm having a particularly 'baggy eyed' day as it has pretty good coverage for a primer. It definitely makes me look more awake in the morning and is a staple product I have for early morning awakenings!
MAC Studio Fix Fluid
I really enjoy using MAC products, as they always give really good coverage. I've used this foundation for pretty much the duration of it's life whenever I go on a night out, as it has really good staying power and gives quite a matte finish for when I get all hot and sweaty in the club (yeahhh - no, seriously, I don't do that very often - but I do tend to get quite shiny if I have heavy makeup on so it's really good for then). I also find that I hardly need to use any for it to make my skin look good - most other foundations I'll use two squirts to cover my face, however, I sometimes have left over product with just one squirt of this! It does irritate me a little that I don't have the squirt-topped bottle, and you have to get that separately.
Urban Fudge Instant Smoothie Spray
I've loved using this product recently, and need to purchase another one soon, especially with the warmer weather starting to roll in. I find that my hair gets quite frizzy if I'm blow drying it without styling it as well, so this is perfect for those lazy morning occasions. If I don't use a product like this I get a literal afro on the bottom half of my hair, whilst the top remains ridiculously flat. With the Smootie Spray, I've found that, as well as smelling really nice in a weird way, my hair is much smoother, but doesn't look greasy after a few hours as I've found when using other alternatives such as hair oils or heat protect spray with argan oil extracts.
That's all my empties (or nearly empties in some cases) - I hope you enjoyed reading about some of my favourite products for a variety of uses and beauty scenarios. Let me know in the comments below what products you love using for things like I've used my empties for!
Paint Yourself Spring | 9 Spring Nail Design Ideas
First off, I just want to make clear - I'm not an expert at nail art. Neither am I very competent at it - so please don't expect works of art! I don't own any fancy equipment, just a dotting tool and I used an old lip brush. These are nail designs for anyone and everyone - not just experienced nail artists!
But, I think that's what makes this good - it can be done by anyone and everyone. Nothing is perfect and I think that things always look that little bit less fake when they are a little rough around the edges. I just love painting my nails and drawing designs on them, even if they turn into a disaster. So - don't judge - just think of it as a tool for employing your own creative ideas and skills and use this post of ideas as more of a base to a whole world of designs and possibilities. Kind of like 'Nail Art for Dummies', only the dummy is me!

| Easter Eggs |
For this look, I highlighted my accent nail with the Rimmel 60 Seconds Coralicious colour, to stand out from the Rimmel 60 Seconds Green. I used the Sally Hansen Nail Art Pen in Neon Pink for dots on the green nails, and then did zig-zag lines as a classic easter egg look alternating the Rimmel Lasting Finish in Black, by using a think brush and the Sally Hansen Nail Art Pen in Purple.

| Spring Animals |
I used Rimmel Lasting Finish Red for the base for all my nails. I then used Rimmel Lasting Finish in Black and a thin brush to create the lady-bird design on my accent nail. On my index finger nail, I used a dotting tool and w7's Nail Polish in White. I then look my thin brush and used Barry M's Nail Polish in Deep Green to draw on the leaves of the strawberry.

| Pink Princess |
For this simple design, I used Kelly Brook Nail Polish in Sparkly Baby Pink, before putting a top coat of Barry M's Nail Polish in Hot Pink Glitter for my accent nail. Using my thin brush, I used Kelly Brook's Golden nail polish to accent all my other nails, by brushing on a thin band at the tips.

| Summer Party |
I started by painting all my nails fully in the Rimmel Lasting Finish in Bright Yellow. Once that was dry, I used the MUA Glitter Nail Effects in Pixie on my accent nail, and then used my thin brush to manoeuvre the diamond shapes to a position I was happy with. I then used the Sally Hansen Nail Art Pens in Pink and Aqua to draw on the striped effects.

| Simple And Classy |
For this simple design, I used BeautyUK Nail Polish in Pale Grey for all my nails, except my accent nail, which I painted with Kelly Brook's Pearlescent Yellow.

| You Make Me Happy When Skies Are Grey |
I started by painting my accent nail in Barry M's Nail Polish in Baby Blue. Whilst that was drying, I painted the remainder of my nails with BeautyUK Nail Polish in Peach, which is one of my favourites for the Spring. Once my accent nail was completely dry, I used my thin brush to paint on a cloud shape with w7 Nail Polish in White.

| Spring Sailing |
I used Kelly Brook's Matte Nail Polish in Navy to paint all my nails, except my accent nail which I painted in w7 Nail Polish in White. I then took a thin brush and painted a diagonal stripe down each of the navy nails, and then used the navy polish to draw on an anchor shape on my accent nail.

| Pastel Polka Dots |
This design is super easy. I painted all my nails white with the w7 Nail Polish in White, before using Sally Hansen Nail Art Pens in Pink, Purple and Aqua to accent each of the tips of my nails a different colour and do random dots on my accent nail.

| Scrumptious Watermelon |
For this design I started by painting a white strip down the centre of my accent nail in w7 Nail Polish in White. I then painted my index and little finger nails in Rimmel Lasting Finish in Red and my middle finger nail in Barry M's Nail Polish in Deep Green. Once they were all dry, I used the red and green on either sides of the white strip, leaving a small thin strip of white visible. I used a thin brush to make sure I had a straight line. I then took my dotting tool and used Rimmel Lasting Finish in Black to do the dots of the watermelon.
Ok, so they aren't the most skilled and polished (pun intended) nail art pieces ever, but I'm proud of them - and they were super simple to do. Hopefully you will be able to do them better than my poor attempts! Leave me a photo in the comments to let me know how you got on or if there is any nail art you'll be rocking this spring? ...I think it's best that I stick to nail transfers!
Thursday, 26 March 2015
11 Spring Eyeshadow Ideas | #SS15
Through the magic of imposing a face onto photo editing software - I have created some simple and easy to do ideas for eyeshadow looks for this spring season. I'm sorry if you were expecting a rustic photo montage of me doing each of these ten looks - but by the time I had done three, my makeup wipes were running thin and my face has changed colour from the almighty amount of eyeshadow I had on it and my brushes, so I will have to apologise for this laziness. But, do enjoy these looks I have created. I have colour matched all the eyeshadows I have used to shadows that I have in my collection.
I have used a L'Oréal Volume Shocking Mascara, my Dior Liquid Pen Liner and my Max Factor Brow Liner in 'medium brown' as a base look before putting my image through the photo editing software.
The Minimalist

Accent Shade | Sleek Storm Palette 'Perfect Storm'
Highlight Shade | Sleek Storm Palette 'Snow Storm'
Definition Shade | Sleek Storm Palette 'Dust Before The Storm'
Transition Shade | L'Oréal Color Infaillible '017: Sweet Strawberry'
Lower Lash Line | MUA Undressed Eyeshadow Palette 'Puff'
The Sunshine

Accent Shade | MUA Single 'Golden'
Highlight Shade | Rimmel London Glam Eyes Quad '013 Sweet Smoulder: 2'
Definition Shade | Sleek Storm Palette 'Thunder Storm'
Transition Shade | MUA Undressed Eyeshadow Palette 'Fawn'
Lower Lash Line | Rimmel London Glam Eyes Quad '021 State of Grace: 4'
The Orchid
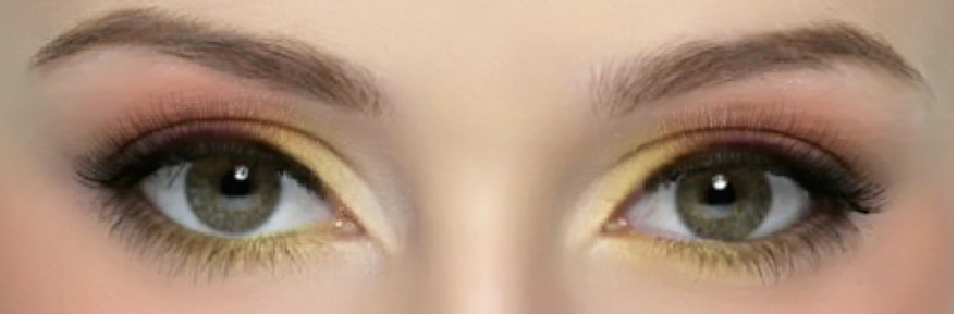
Accent Shade | Sleek Storm Palette 'Eye of the Storm'
Highlight Shade | Rimmel London Glam Eyes Quad '013 Sweet Smoulder: 2'
Definition Shade | MUA Undressed Eyeshadow Palette 'Henna'
Lower Lash Line | MUA Single Eyeshadow 'Golden'
The Au Naturale

Accent Shade | MUA Undressed Eyeshadow Palette 'Hazel'
Definition Shade | MUA Undressed Eyeshadow Palette 'Blushed Brown'
Lower Lash Line | MUA Undressed Eyeshadow Palette 'Fawn'
The Bold Liner

Accent Shade | Sleek Storm Palette 'Eye of the Storm'
Definition Shade | Sleek Eye Palette 'Calm Before the Storm'
Lower Lash Line | Rimmel London Glam Eyes Quad '021 State of Grace: 2'
The Sunset

Accent Shade | MAC Single Eyeshadow 'Rule'
Highlight Shade | Rimmel London Glam Eyes Quad '012 Sweet Smoulder: 2'
Definition Shade | MAC Single Eyeshadow 'Amber Lights'
Transition Shade | MUA Undressed Eyeshadow Palette 'Puff'
Lower Lash Line | Rimmel London Glam Eyes Quad '003 Smokey Purple: 2'
The Subtle Smokey Eye

Accent Shade | MAC Navy Times Nine Palette 'JG Grey'
Highlight Shade | MAC Navy Times Nine Palette 'Silver Fog'
Definition Shade | MAC Navy Times Nine Palette 'Cloudscape'
Lower Lash Line | MAC Navy Times Nine Palette 'JG Grey'
The Garden

Accent Shade | MAC Single Eyeshadow 'Fiction'
Highlight Shade | MAC Single Eyeshadow 'Humid'
Definition Shade | Sleek Storm Palette 'Storm Cloud'
Transition Shade | Sleek Storm Palette 'Thunder Storm'
Lower Lash Line | MAC Navy Times Nine Palette 'JG Grey'
The Wedding
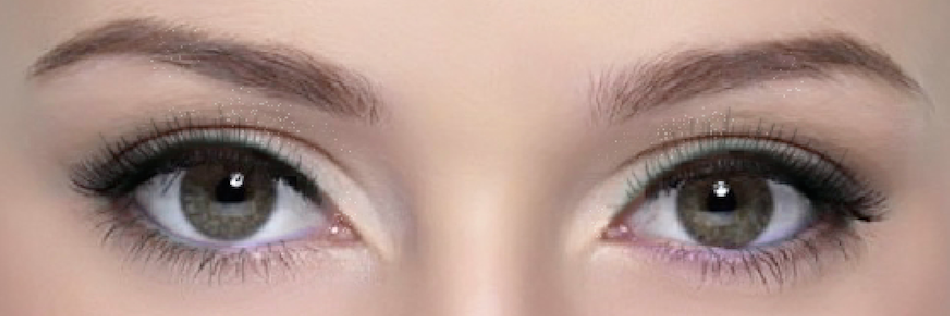
Accent Shade | Rimmel London Glam Eyes Quad '021 State of Grace: 1'
Highlight Shade | Rimmel London Glam Eyes Quad '021 State of Grace: 3'
Definition Shade | Sleek Storm Palette 'Electric Storm'
Lower Lash Line | Rimmel London Glam Eyes Quad '021 State of Grace: 4'
The Peacock

Accent Shade | Sleek Storm Palette 'Storm Cloud'
Highlight Shade | Rimmel London Glam Eyes Quad '003 Smokey Purple: 4'
Definition Shade | MAC Purple Times Nine 'Satellite Dreams'
Transition Shade | MUA Undressed Eyeshadow Palette 'Fawn'
Lower Lash Line | MAC Purple Times Nine 'Lightly Sugared'
The Ivy Garden

Accent Shade | MAC Single Eyeshadow 'Swimming'
Definition Shade | MAC Single Eyeshadow 'Humid'
Lower Lash Line: Rimmel London Glam Eyes Quad '013 Sweet Smoulder: 1'
I hope you enjoy the eyeshadow ideas and looks - I apologise once again for the photo edited-ness of this post but my carpet and my makeup remover wipes couldn't take any more battering - not to mention the redness that was coming up on my skin after removing so much eyeshadow from my face!
How Many Makeup Brushes?! | My Brush Collection
I think it's safe to say that my makeup brush collection is a little bit insane - although I can fit it all in one carrier at the moment, so things are going better than expected! All my makeup brushes are categorises into a number of elements from what harshness of brush they are and their size and what product types I use them for in particular.
My current makeup brush collection:
The majority of my brushes came as a 32 piece set from LightInTheBox.com, whereas my others are a range of other brands. I have (from left to right) a Sally Hansen Brow Brush and Comb, an Avon concealer brush, a Benefit concealer brush, an Avon contouring brush, a MAC foundation brush, a Wilko powder foundation brush and a Benefit powder foundation brush.

I find that I do actually use pretty much all the brushes in this collection. The things I probably use least are the lip brushes, as I don't really wear a lot of lip glosses or lip balms that require a brush to apply - I much prefer just using lipstick straight out of the tube! I never used to have different varieties of eyeshadow brushes, but as I have become more adventurous with my contouring and definition in my eye shadows I don't know how I would live without these many different types of brushes! I really like having a combination of soft and hard brushes as well as it makes it so much easier to highlight and blend where you want and when you want.
I can only see this collection of makeup brushes growing so watch this space!
Wednesday, 25 March 2015
17 Shades of Spring | My Lipstick Collection
Spring is one of my favourite times of year, as all the colours of lipstick I love the most are back in fashion and look incredible! Whilst I'm sad to put away my maroon shades I have been loving this Winter, I am glad to be able to dig out my oranges and pinker coloured lipsticks again ready for the warmer months. I want to share with you today the shades which I will be rocking this Spring...I haven't included tinted lip balms (bar one) or lip glosses in this collection as I rarely wear them!

Spring is all about bringing out the more vibrant orange and pink colours - and I am ready and prepared for any outfits perfect companion with my '17 Shades of Spring' personal lipstick collection.
The Pastel Colours
Pastel colours are making a transition from clothing to makeup this Spring, and I think that no collection would be complete without some beautiful peach and pink based pastel colours to highlight the changing months. I have changed my wardrobe around to feature a lot of greens and blues this spring, and I want my lipstick to compliment that, so I have selected three pastel colours which will be making up my Pastel collection this spring
1 | MaxFactor 'English Rose: 510'
2 | ASDA 'Beige Bliss: 06'
3 | ASDA Matte 'Smooch: 1'

The Oranges
Oranges are another colour that I'm really happy to see this spring, and there are some fantastic new lipsticks out there which are perfect for the warmer tones. I grabbed one in particular (featured here) from MaxFactor a few weeks ago which really rekindled my love of the MaxFactor lip products, which is more of a tinted lip balm - but the colour is so vibrant and lovely I couldn't resist putting it in this lipstick collection. I think orange is a colour which is so nice to have in these warmer, more sunny days, and something which we will be seeing a lot of in the coming months - especially from me with my day time outfits!
4 | MaxFactor Colour Intensifying Lip Balm 'Posh Poppy: 4330'
5| Dior Addict ' Spring Ball: 343'

The Pinks
Changing out of the bright pinks I'v been seeing, and expect to see again come the summer time, spring is the perfect time to experiment with a more toned down pink in the day time, and I have a number of favourite shades which have been with the for numerous springs in some cases!
6 | Barry M '339:113'
7 | ASDA ' Small Talk: 17'
8 | ASDA 'Casino: 19'
9 | MaxFactor 'Bewitching Coral: 827'

The Nudes
Nudes are always a staple collection to have in any season, but this spring, I have gone for more pink and peach coloured nudes - and one product from Avon which I think is fantastic at the moment and it is incredibly moisturising. I find this a god send in these awkward months where the warm weather hasn't quite reached us in Good Olde Blighty and my lips get very chapped.
10 | Avon Moisturising Miracle 'Pink'
11 | L'Oreal Made For Me Lip Blush (Dark Brunettes) 'Berry Blush: 258'
12 | MAC Frost 'Plum Dandy: AB2'
13 | MAC Matte 'Velvet Teddy: A23'

The Night Time Hotties
Every season has its day time and night time looks - and for me this spring it's all about the bright reds and pinks for the night time look. Winter warm colours such as purples are gone and bright, vibrant colours are making a come back for evening looks in the spring.
14 | Bourjois Rouge à Lévres 'Sweet Kiss: 56'
15 | L'Oreal Made For Me Intense (Dark Blondes) 'Burning Rose: 286'
16 | Rimmel London Moisture Renew 'As You Want Victoria: 360'
17 | Colorsensational 'Cherry Candy: 550'

14 | Bourjois Rouge à Lévres 'Sweet Kiss: 56'
15 | L'Oreal Made For Me Intense (Dark Blondes) 'Burning Rose: 286'
16 | Rimmel London Moisture Renew 'As You Want Victoria: 360'
17 | Colorsensational 'Cherry Candy: 550'
Twisted Beauty | Rachael McKenzie. All rights reserved. BLOG DESIGN BY Labinastudio.